


What’s the best fertility monitor: Inito vs Mira? I read all of the online comparisons, but I really needed to try them out for myself!
As a registered dietitian who also has PCOS, I was excited to see how the two compared. I simultaneously used both the Mira and Inito monitors to track my own hormone levels and compare the two fertility monitors, so you don’t have to!
In this blog post, I’ll review which hormones these two fertility monitors test for, where to find your results, and the pros and cons of each one!
Comparing Inito vs Mira
As a PCOS dietitian, I was gifted both the Mira Hormone Monitor Max Kit and the Inito Starter Kit by each company, respectively. I had sporadically tried out each one to determine how easy they were to use, but I had never compared the two against each other.
If you’re new around here, here’s a little background on me: I’m a registered dietitian specializing in polycystic ovary syndrome (PCOS) – now known as polyendocrine metabolic ovarian syndrome (PMOS). I also struggled with my own fertility journey prior to finally being diagnosed with PCOS. I understand the mental struggles, frustration, and heartbreak that infertility brings.
If I had known about these at-home fertility monitors back then, I absolutely would have bought one. I probably would have paused though and wondered if they both were worth their respective price tags and if one was more accurate than the other.
For the past several years, my periods have been like clockwork. I consistently have 28 to 30 day cycles, and I can easily identify my own fertile window based on cervical mucus changes. I typically ovulate around day 16 or 17 of my cycle — I also use a Tempdrop device (a wearable basal body temperature sensor) to confirm ovulation as well.
Since I already had a good understanding of my own menstrual cycle, I feel it gave me a “leg up” in my ability to determine the accuracy of the Inito & Mira fertility monitors.
Alright, let’s dive into some specifics on each of these fertility monitors.
Read my full thoughts and review of the Tempdrop wearable thermometer sensor here.
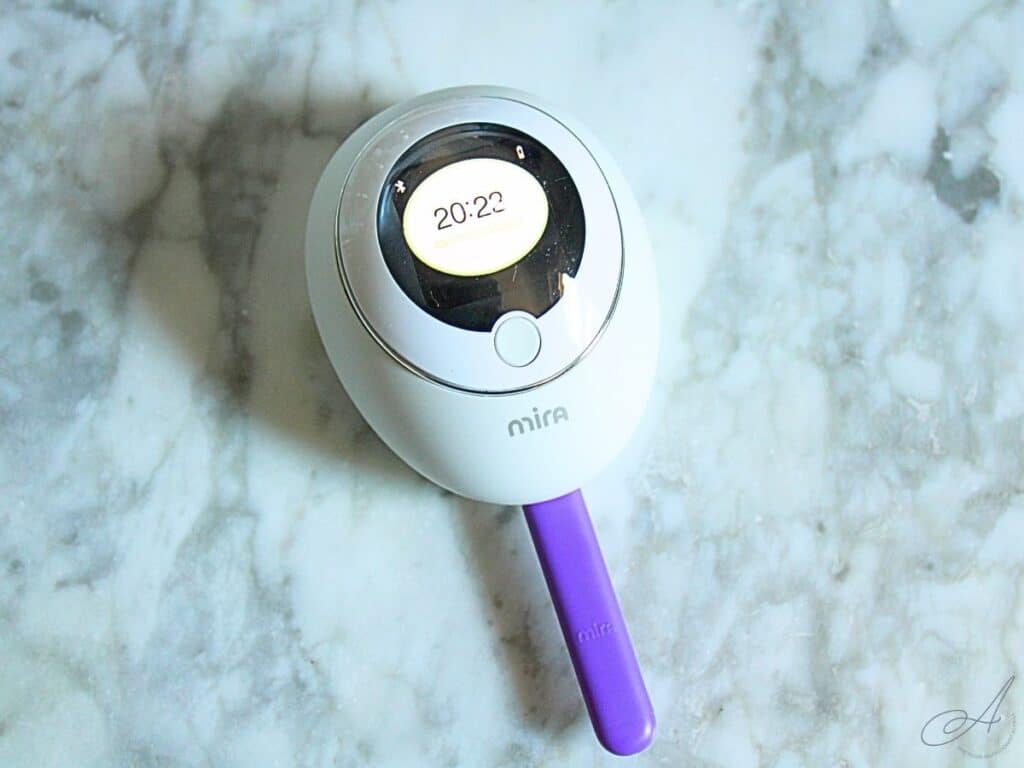
What Is Mira?
The Mira Hormone Monitor Max Kit is a palm-sized device that uses lab-grade technology to measure fertility hormones through your urine with 99% accuracy.
The Mira Hormone Monitor Max Kit tests for these three key hormones:
- LH (luteinizing hormone). This is the hormone that surges approximately 24 to 36 hours prior to ovulation.
- E3G (estrone-3-glucuronide). This is a urine metabolite of estradiol, a type of estrogen. Levels of E3G often rise 1 to 3 days before the LH surge and often signals the beginning of the fertile window.
- PdG (pregnanediol glucuronide). This is a urine metabolite of progesterone. PdG levels only rise after ovulation, so they can be used to confirm that ovulation has actually occurred.
Mira also offers the option to test your FSH (follicle stimulating hormone) levels for an additional cost. This may provide more insight into your fertile window or help you to predict menopause.
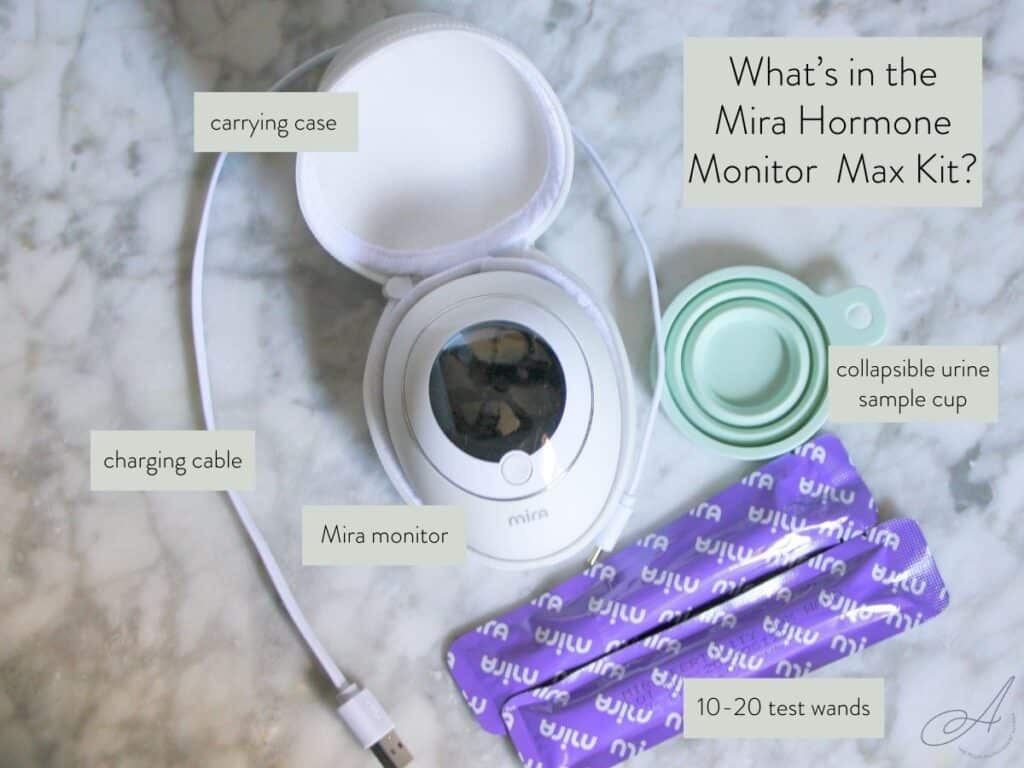
What’s Included In The Mira Max Kit?
Inside the Mira Hormone Monitor Max Kit, you’ll get several items to get you started on your fertility journey.
Here’s what’s included:
- Mira Hormone Monitor
- Carrying case
- Charging cable
- Pack of Max Wands aka test strips (10 or 20 count depending on the option you choose)
- Collapsible urine sample cup
One of my first questions when I was first looking into these types of fertility monitors was: how many test wands would you need monthly? The answer is going to vary. Since you don’t need to test every single day, it will depend on whether you have irregular menstrual cycles or how long your cycle length is. The Mira app will tell you which days to test, but, you should anticipate needing anywhere from 10 to 20 wands per month.
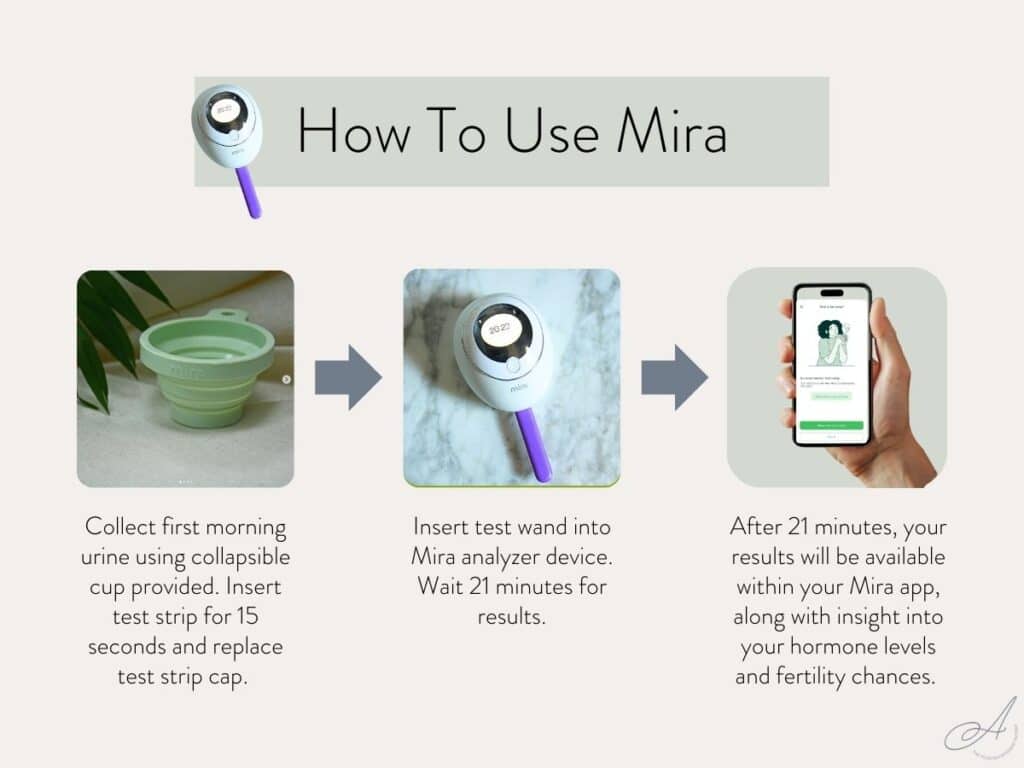
How Does Mira Work?
Mira measures your fertility hormones by analyzing your urine. If you want to know the nerdy science stuff, Mira uses immunochromatography with fluorescence labeling.
If you want to know the basics though, here’s how it works:
- Use the included urine sample cup to collect your first morning’s urine (this is the best time to test).
- Dip your Mira wand into the urine sample for 15 seconds.
- Remove the cover from the opposite of the Mira wand and slide it over the urine sample side of the wand (so you don’t get pee everywhere!).
- Insert the wand into the Mira device and wait 21 minutes for the results.
- The results will sync to the free Mira app that you’ll have to download.
The Mira device will flash you clear results on the monitor’s screen. The hormone levels are shown as numerical values, rather than just general thresholds such as “low fertility” or “high fertility”. All of your results will also be found in your Mira app. Let’s talk more about the app!
The Mira App
To actually be able to track your results and hormone patterns, you’ll need to download the free Mira app. The Mira app does not require a monthly subscription or any additional cost to use it. This app is available for both iPhone and Android users.
The Mira device will automatically sync your hormone results to your app via Bluetooth. The app will plot your hormone’s numerical values in a chart to allow you to easily see trends.
It also “reads your charts” using its algorithm-based system and provides you with daily directions as to whether you’ll need to take a hormone test that day or not. The Mira app will also identify your fertility chances with a fertility score within the app, and then confirm when you’re in your fertile window and when your body has ovulated.
My Mira Charts
Below is a copy of my Mira chart. I’ve circled the LH surge, along with the PdG rise that confirmed successful ovulation. The app then confirmed that cycle day 14 was my ovulation day.
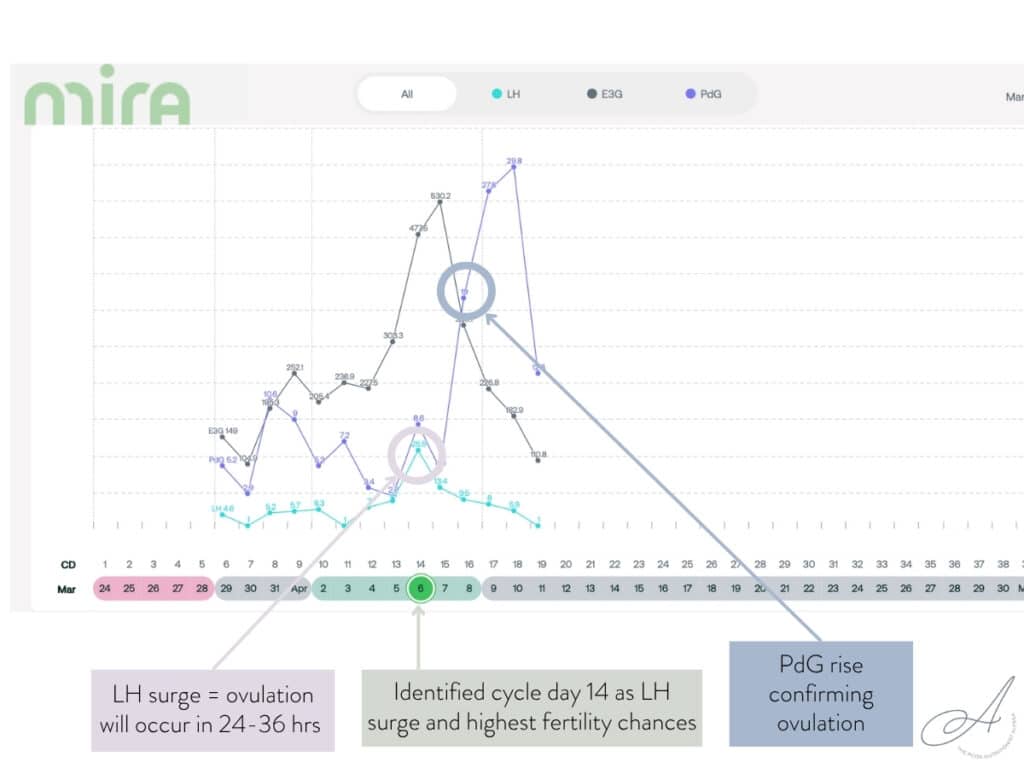
The chart may seem a little difficult to read at first, but the app also analyzes your results and gives you clear indicators as to what part of your cycle you’re in. It clearly identifies your fertile window and confirms ovulation. Below are some screenshots from the Mira app describing my fertility chances during various days in my own menstrual cycle.

Cost of Mira Hormone Monitor
The Mira Hormone Monitor, or any of these ovulation trackers for that matter, are not cheap. Using a discount code, the Mira Hormone Monitor Max Kit will cost you $219 USD if you choose the option with 10 Mira wands or $229 USD if you choose the option with 20 Mira wands.
Financially, it makes more sense to choose the option with 20 wands here since a refill pack of 20 Mira Max wands on its own will cost you $89 USD. Mira also has monthly subscription options that will give you a 10% savings.
Remember, Mira advises that you can expect to use 10 to 20 wands per month depending on your cycle length.
If you’re interested in trying Mira, you can use code 2ALYSSA20 on both the Mira Hormone Monitor Max Kit and on refill wands. The code 2ALYSSA20 brings the cost of the Max Kit with 20 wands down to $183.
Alright, let’s talk about the Inito!
What Is Inito?
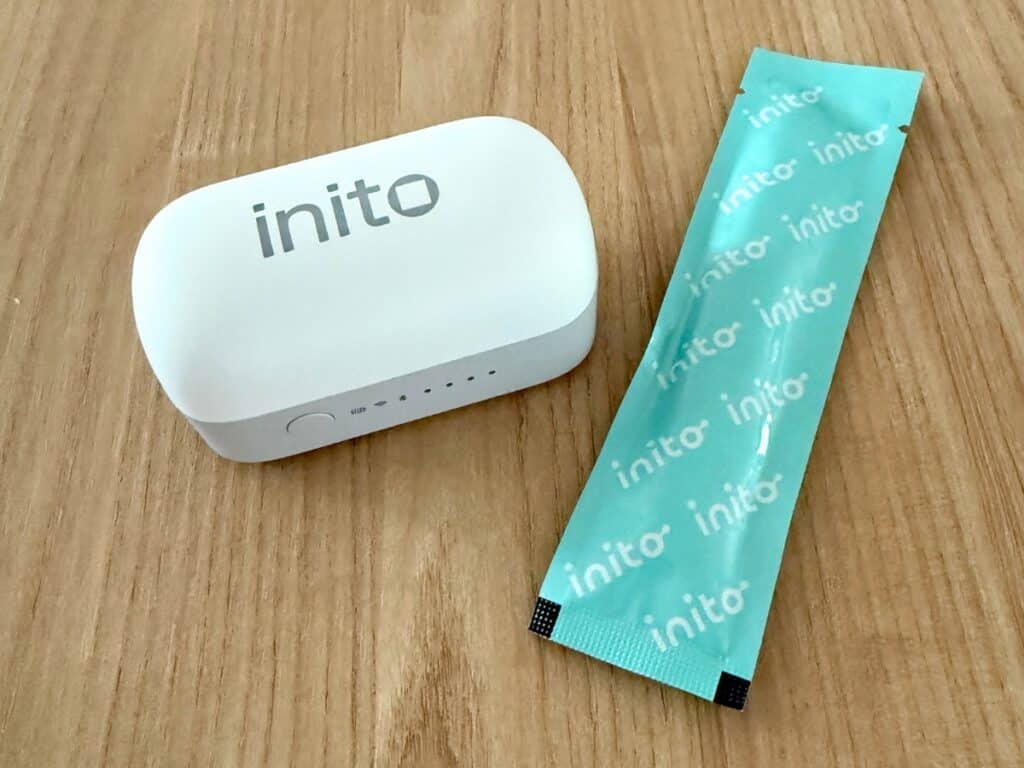
The Inito InSight Wireless Reader is a compact standalone fertility monitor that tells you everything you need to know about your fertility hormones, right at your fingertips.
The Inito Fertility Monitor tests for these four reproductive hormones:
- LH (luteinizing hormone). This is the hormone that surges approximately 24 to 36 hours prior to ovulation.
- FSH (follicle stimulating hormone). This hormone works closely with LH and is necessary for follicle development and ovulation.
- E3G (estrone-3-glucuronide). This is a urine metabolite of estradiol, a type of estrogen. Levels of E3G often rise 1 to 3 days before the LH surge and often signal the beginning of the fertile window.
- PdG (pregnanediol glucuronide). This is a urine metabolite of progesterone. PdG levels only rise after ovulation, so they can be used to confirm that ovulation has actually occurred.
Off the bat, Inito does measure an additional hormone (FSH) that Mira does not test for with their Max wands…Mira does offer FSH wands for an additional cost. Let’s check out what comes with the Inito Starter Kit.
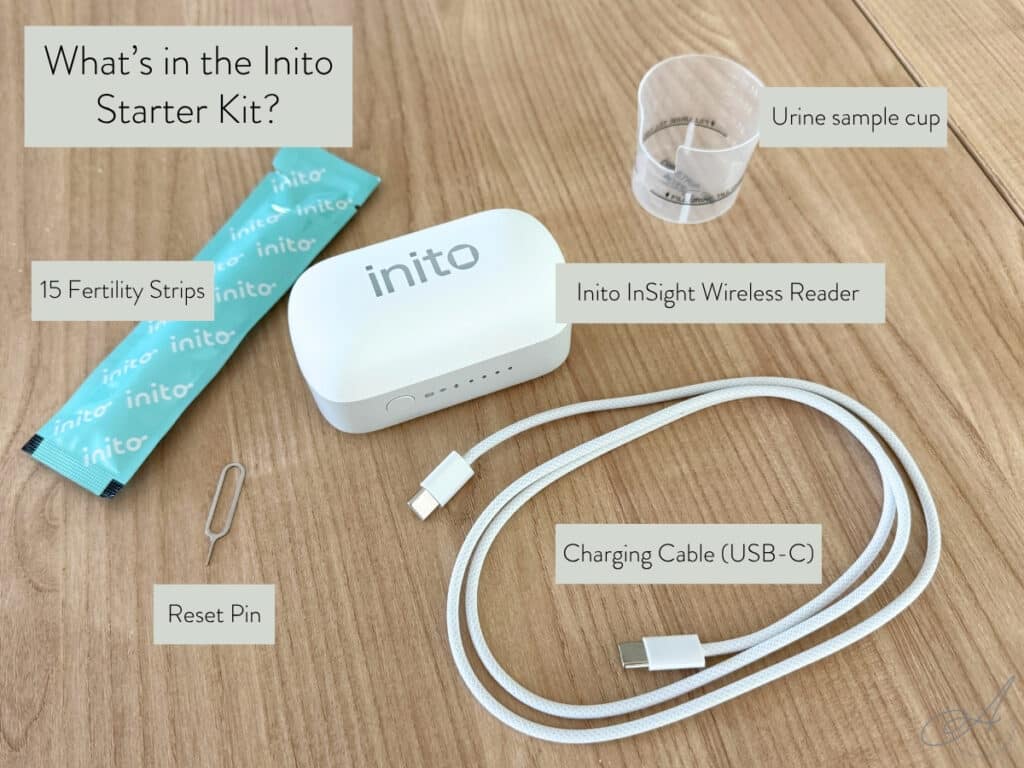
What’s Included In The Inito Starter Kit?
IInside the Inito Starter Kit, you’ll receive everything you need to get you started on your fertility journey.
The Inito Starter Kit comes with:
- Inito InSight Wireless Reader
- Charging cable (USB-C)
- Pack of 15 Inito Fertility Strips
- Urine sample cup
- Reset pin
The Inito device will also tell you which days you should be using a Fertility Strip and doing one of the urine tests. According to the Inito website, the amount of Fertility Strips you’ll need will depend on your cycle length. Someone with an average 30 day cycle will need 12 to 15 test strips.
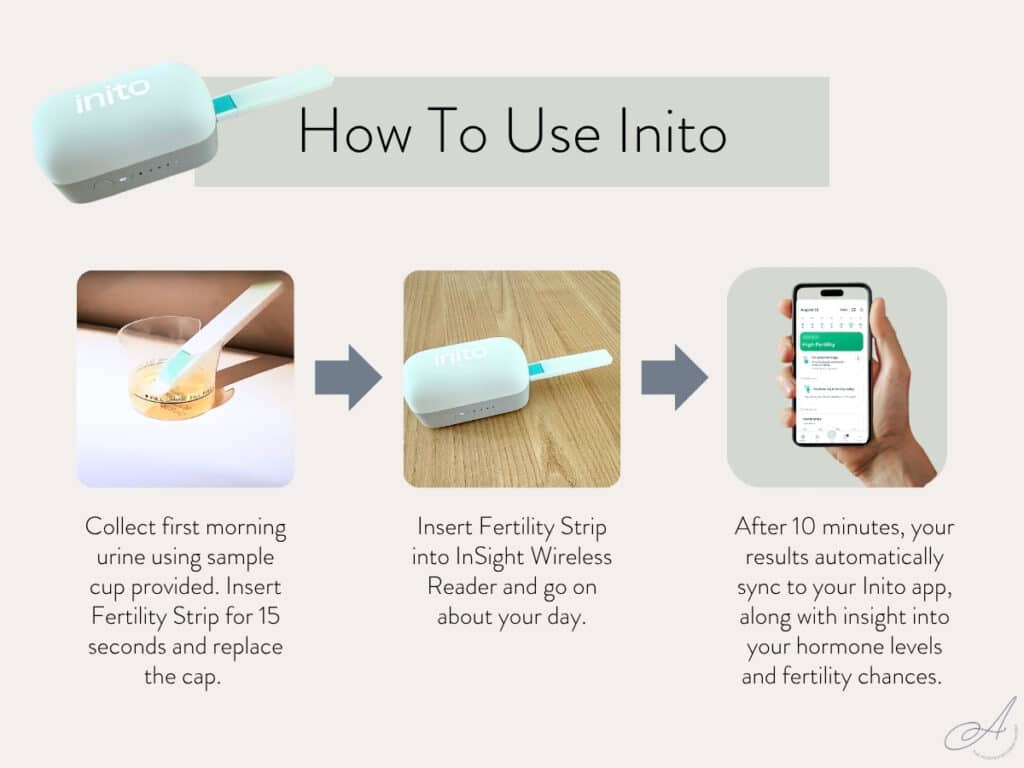
How Does Inito Work?
Inito measures your fertility hormones by analyzing your first morning urine.
Here’s the steps you’ll take when using Inito:
- Use the included urine sample cup to collect your first morning’s urine (this is the best time to test).
- Dip your Inito Fertility Strip into the urine sample for 15 seconds.
- Remove the cover from the opposite end of the Inito Fertility Strip and slide it over the urine sample side of the strip.
- Insert the Fertility Strip into the InSight Wireless Reader. It will take 10 minutes for the results to process. Unlike the past model, though, you don’t need to wait around for the results! You insert the Fertility Strip into the reader and you can go about your morning routine. You can go get ready and eat breakfast, and when you’re done, the results have automatically been synced to your app.
- The results will sync to the free Inito app that you’ll have to download.
The app is available for iOS and Android, and will walk you through these steps each time you test if you need the reminder!
Inito uses Spectral Mapping technology, which combines fluorescence and visual colorimetric imaging to double-check every test before producing a final result. This helps detect subtle hormone shifts that other readers can miss, creating more dependable results every time.
All hormone levels are shown as numerical values, rather than just general thresholds such as “low fertility” or “high fertility”. All of your results will also be found in your Inito app. Let’s talk more about the app!
The Inito App
I briefly mentioned this above, but you’ll need to download the free Inito app to actually see and track your hormone levels and patterns. The Inito app does not require a monthly subscription or any additional cost to use it.
Note: Inito used to be only available for iPhone users, but with their newly launched InSight Wireless Reader, it’s now available for use for both iPhone and Android users.
The InSight Wireless Reader will automatically sync your hormone results to your app. The app will plot your hormone’s numerical values in an easy-to-read chart to allow you to easily see trends.
I find the Inito charts to be easier to read and more aesthetically pleasing than the Mira charts. Inito also will put a color-coded vertical line on your chart on the days where your LH surged, ovulation occurred, and PdG increased to confirm ovulation.
The Inito app also “reads your charts” and provides you with daily directions as to whether you’ll need to take a hormone test that day or not. The app will also tell you when you’re in your fertile window and when you’ve actually ovulated.
My Inito Charts
Below is a copy of my hormone results in the Inito app. I’ve circled the LH surge, however, you can also see that Inito inserted a purple vertical line to clearly identify the LH surge and peak fertility also. Inito also inserted a green vertical line to identify a “high fertility” day.
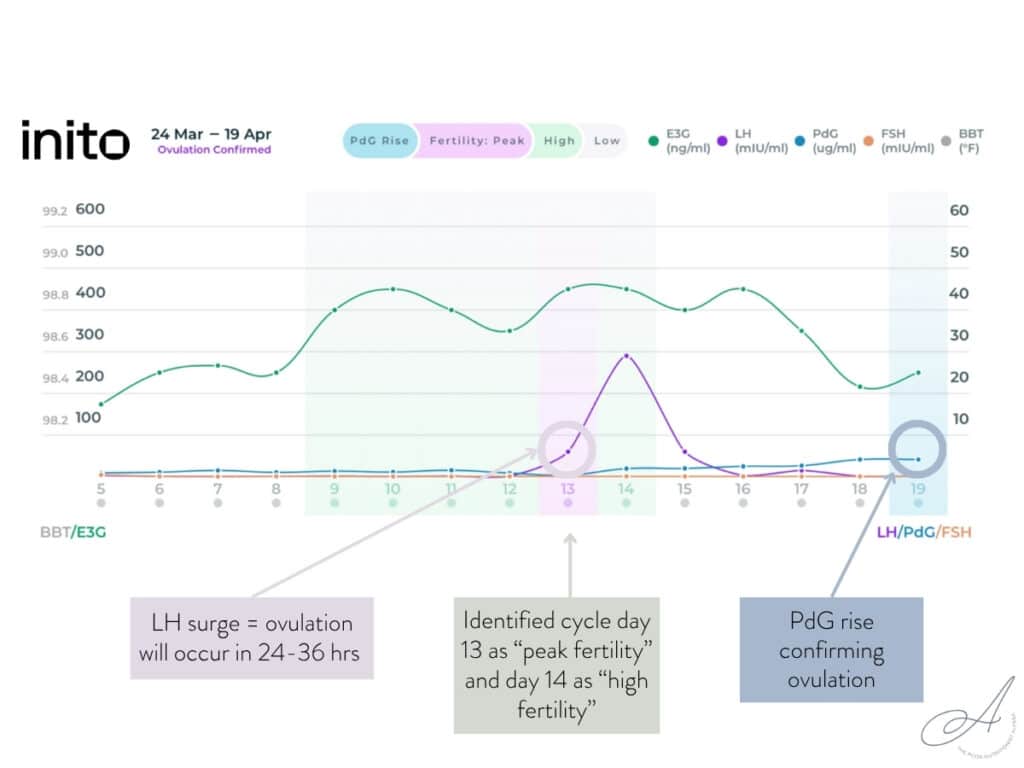
Although it doesn’t look like a huge increase when you’re looking at this Inito chart of my cycle, the Inito app confirmed a rise in PdG on cycle day 19. This indicates I did in fact ovulate. You can see the vertical blue shading that highlights the PdG rise.
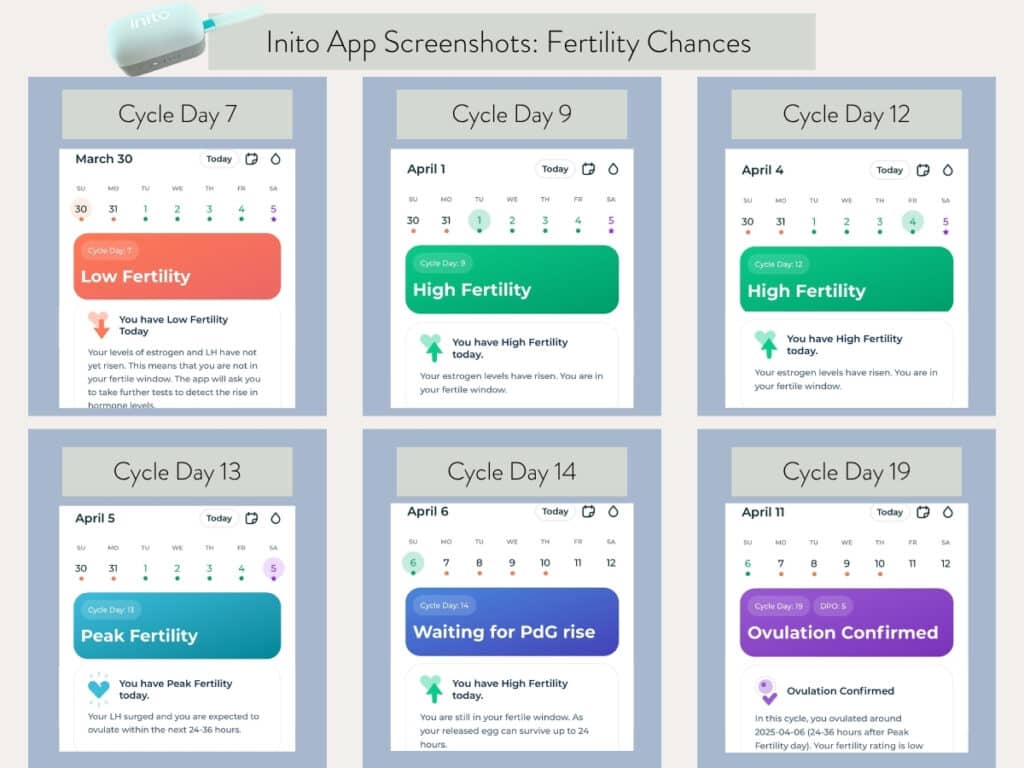
Below are some screenshots from the Inito app describing my fertility chances during various days in my own menstrual cycle. These results are very similar to the Mira results.
One key difference that I noticed is that Inito identified my fertile window earlier than Mira did. Inito told me I was within my fertile window on cycle day 9. In hindsight, this was accurate since both apps identified cycle day 14 as my ovulation day and a typical fertile window is anywhere between 5 to 7 days leading up to ovulation. If I were trying to conceive, Inito would have given me a better chance of conceiving since it identified my fertile window earlier.
Another key difference is that Mira confirmed ovulation had occurred 3 days earlier than Inito did. Mira told me on day 16 that I had ovulated on cycle day 14, while Inito told me on day 19 that I had ovulated on cycle day 14. Both apps identified cycle day 14 as my ovulation day – they just differed in when they were able to confirm it had actually happened. While this is good information to know as soon as possible, it doesn’t change anything that you’re going to do if you’re trying to conceive. Once you’ve ovulated, it’s just a waiting game — all the actionable steps you need to take to get pregnant (ahem, intercourse!) happen before or on ovulation day.
Cost of Inito Fertility Monitor
The start-up cost of the Inito is quite a bit lower than Mira. The Inito Starter Kit will cost you $169 USD, which comes with 15 Fertility Strips to last you about a month. You can take advantage of special launch pricing though which brings the InSight Wireless Reader Starter Kit to just $99 as part of the launch offer using my code: ALYSSAINITO
When you need to refill your test strip supply, it will cost you $49 USD for a 15-pack. Remember, you can expect to use approximately 12 to 15 test strips per month. You can purchase multiple packs of test strips at one time for a discounted rate…essentially, the more you buy, the lower each individual pack will cost.
If you’re interested in trying Inito, you can use the code ALYSSAINITO on an Inito Starter Kit. The code ALYSSAINITO brings the cost of the Starter Kit down to $99.
Inito vs Mira: Which Is Better?
Honestly, these are both amazing fertility monitors that can give you a full picture of your cycle. They both have the ability to identify your peak fertility days and confirm successful ovulation. They’re both suitable for those with irregular cycles, such as those of us with PCOS (now called PMOS).
Using the same morning urine sample daily, Mira and Inito both gave me similar results when you look at the big picture. Looking at the nitty gritty, the key details were that Inito was able to identify my fertile window earlier than Mira, which is really helpful when you’re trying to conceive since the chances of conception max out at 42% the day before ovulation.
On the other hand, Mira confirmed successful ovulation 3 days earlier than Inito. While this is great information to know, knowing this information 3 days sooner doesn’t change anything you should be doing to conceive since the days leading up to ovulation and ovulation day are the most important days.
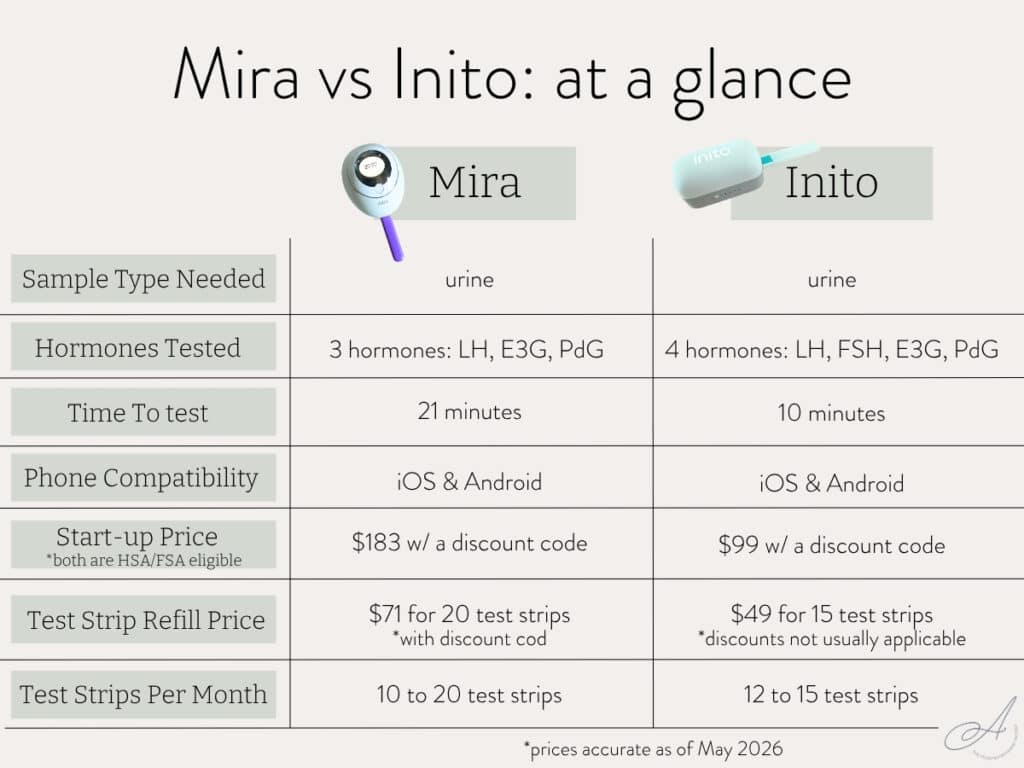
Unlike Mira, Inito does have the added benefit of testing for 4 hormones on a single Fertility Strip, since it also tests for FSH. You do have the option to test FSH using the Mira Hormone Monitor, however, you’d need to purchase the FSH strips for an additional cost. Although, if fertility is your goal, I don’t really think this is a huge factor since LH, E3G, and PdG give you the info you really want.
Inito’s new InSight Wireless Reader has made it so you no longer need to rely on your iPhone and its’ camera to get your results. You can just insert your urine Fertility Strip into the wireless reader and walk away. Inito also works seamlessly for both iPhone and Android users now.
Ultimately, Inito’s new InSight Wireless Reader has changed the game. It’s the most affordable and most complete picture of your cycle available. If I were focusing on my fertility, the Inito InSight Wireless Reader is what I would choose.
Want to try either of these devices? You can use my affiliate links/codes to obtain a discount! To try Mira or order discounted refill wands, use this link or enter code 2ALYSSA20 at checkout. To try Inito, use this link or enter code ALYSSAINITO at checkout.
Other Popular Hormone Marker Tests
There are many other hormone marker tests on the market.
Here’s a few popular ones and a brief description of what they test for:
- Clearblue Fertility Monitor – This monitor tests for just LH & E3G. It can be used to identify your fertile window, however, it does not confirm whether or not your body actually ovulated.
- Proov Confirm – These test strips only test for PdG, which can confirm whether or not ovulation has actually occurred. You’ll need to download the free Proov insight app to track your test result. These strips do not identify your fertile window so you may miss the opportunity to “try” on the right days of your cycle.
- Traditional Ovulation Kits – These test strips only measure LH levels. This can help you identify the 24-36 hour period prior to the day of ovulation, but it doesn’t confirm that your body has actually ovulated.
None of the products listed above test for all of the same hormones that Mira and Inito test for, nor do they give you as clear of a picture of your menstrual cycle as Mira or Inito do.
Don’t miss this post: PCOS + Ovulation Tests: Do They Work for Irregular Cycles?
The Bottom Line
These new monitors can be a game changer for those who are looking for more in-depth and useful information on their menstrual cycles. Whether you’re looking to get a positive pregnancy test, or just to get a better understanding of your menstrual cycle, these products can be a valuable addition to your life.
Both are an at-home hormone test kit that analyzes your urine to identify your fertile days and confirm successful ovulation. Both devices provide you with actual values, along with a clear marking of whether you’re in a “low fertility” or “high fertility” period of your cycle.
Mira and Inito both require you to download their free phone app to track your hormone patterns. You do not need a monthly subscription to use the apps, but you will need to purchase urine test strip refills to be able to continue using the monitor.
Ultimately, based on my own comparison of the two monitors using my first morning urine samples, I would recommend choosing Inito’s new InSight Wireless Reader. All you do is dip your urine strip, insert it into the wireless reader, then go – the results will automatically sync to your free Inito app. Plus, their current launch pricing of $99 makes this an incredible buy because it comes with everything you need to get started, including a month-supply of Fertility Strips.
To try the Mira Hormone Monitor Max Kit or to order discounted refill wands, use this link or enter code 2ALYSSA20 at checkout for a discount. To try the Inito Starter Kit, use this link or enter code ALYSSAINITO at checkout for a discount.
Other Posts You’ll Love
Diet Plan To Get Pregnant (Free PDF & Recipes)
Best Prenatal Vitamins for PCOS
Essential Oils for PCOS + Hormone Blend Recipes
Hormone Balancing Teas for Women
Disclaimer: This blog post contains gifted products and affiliate links. This is not a sponsored blog post. As always, opinions are 100% my own. This blog post is for informational purposes only. It does not replace professional medical advice. Always discuss your unique medical needs with your healthcare provider.
2 Responses
It’s nice to see someone else use both. I bought both for myself because I was using cheap premom or glow strips before and wanted actual numbers.
For me however, Mira showed that I ovulated days before I actually took my trigger shot, while Inito matches with my doctor and medication accurately. So interesting to see.
So interesting! I do feel like they’re both really great tools for helping us understand our bodies/hormones a bit better. Unfortunately, neither are going to be foolproof but definitely nice to see the actual numbers, graphs and trends of hormones!